Interior Barn Doors
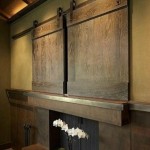
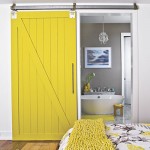
Interior sliding doors, or “barn doors”, offer several benefits to a traditional door. Unlike their hinged counterparts, slider doors occupy very little space. This type of door is actually mounted on hardware placed outside the door frame. Slider doors do not require an area for the door to swing open into the room, nor do they have the construction constraints of a pocket door. Barn doors can replace a traditional door, or they may also occupy an entire wall. Slider doors may act as dividers between rooms, providing abundant flexibility and multi-function to the space. My favorite thing about slider doors is that they come in a variety of styles and add instant interest and upgrade appeal to any space.  Barn-style sliding doors can also offer a decorative and functional solution to conceal televisions.
I found two affordable websites that carry the barn doors and the hardware: Barn Doors Hardware and Rustica Hardware. The latest product line from the hardware manufacturer K. N. Crowder brings barnyard technology into sophisticated homes. The Crowder Flat Track sliding door system has a “rustic, barn-door kind of look that you used to see on stables,” said Jeremy Crowder, the company’s vice president. “Most sliding-door hardware is hidden inside the ceiling or walls — with this system, everything is exposed,” including the plated-steel flat bar track and wheels.
 DIY: HOW TO HANG AN INTERIOR BARN DOOR TRACK SYSTEM
Use these step-by-step instructions to install an interior barn door track system.
Step 1: Make Sure You Have the Necessary Hardware
The hardware with the sliding barn door system should include the following: 2″ flat steel track, track joint brackets, spacers, screws, lag bolts, carriage bolts, hanger rollers, bottom roller guide and bottom rollers. In this project, the barn door is constructed using 3/4″ tongue-and-groove planks held together with two 1/2″-thick vertical stiles and two horizontal rails (top and bottom) on both sides, for a total frame thickness of 1-3/4″. The planks are also bolstered by 1/2″-thick cross bucks cut to form an “X” on one side of the door to give it a “barn door” look.
Step 2: Attach a Mounting Board
To secure the track to the wall and add support for the heavy barn door, cut a 1″ x 4″mounting board the same length as, but a little wider than, the track. Use the drywall anchors, spacers and lag bolts to secure the mounting board. In this project, the mounting board was painted black and the edges rounded slightly for a more finished appearance.
Step 3: Assemble and Cut the Track
Assemble the flat steel track with joint brackets according to the manufacturer’s instructions. Cut the track to the length needed — twice the width of the door allows the door to open the entire width of the door space, as in our example.
Step 4: Drill Holes in the Track
Next, measure and drill holes with a metal-cutting drill bit in the steel track where it will be attached to the mounting board and wall. Use an awl or a punch to create a seat for the drill bit so it doesn’t slip on the metal while you’re drilling. Apply some cutting oil to the drill hole to keep the area cool.
Step 5: Install the Track and the Spacers
Measure for the track system. Using lag bolts, install the track and spacers to the mounting board and wall, making sure that the track is perfectly level.
Step 6: Attach the Hanger Rollers and Hang the Door
Attach hanger rollers to the door according to the manufacturer’s instructions, using the supplied carriage bolts, washers and nuts. Use a socket wrench to tighten.With another person or two, attach the bottom roller guide and rollers, and hang the door on the track.


